How to Build Your Organizational Chart in Word
Discover how to build a clear, dynamic organizational chart in Word and save it as a template with our step-by-step guide.

Creating an organizational chart in Microsoft Word is like piecing together a puzzle. Each piece represents a role in your company, and when they fit together, they form a clear picture of your business's structure.
In this guide, I'll walk you through the process of building an organizational chart using Word's SmartArt feature. It's a tool that simplifies the creation process, ensuring your lines are aligned and your team's hierarchy is crystal clear.
Getting Started with SmartArt
Step 1: Open Microsoft Word
Begin by launching Microsoft Word. Create a new document or open an existing one where you want to insert your organizational chart.
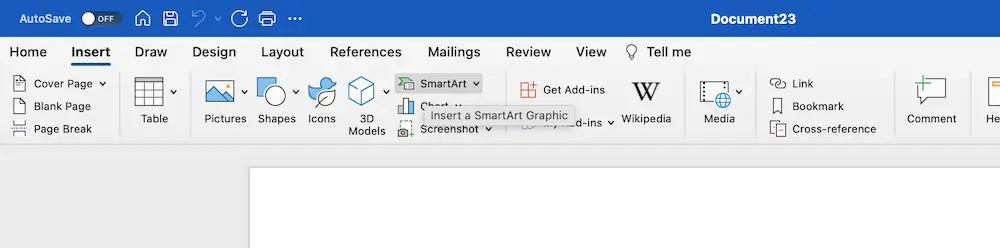
Step 2: Accessing SmartArt
- Click on the 'Insert' tab on the Word ribbon.
- Look for the 'SmartArt' button in the 'Illustrations' group.
- Click on 'SmartArt' to open the SmartArt Graphic dialog box.
Step 3: Choosing the Right SmartArt Graphic
When you're ready to create an organizational chart in Microsoft Word, selecting the appropriate SmartArt graphic is a pivotal step. Here's how to navigate the options and pick the right one for your needs:
Navigating to the Hierarchy Group
- In the left pane of the SmartArt Graphic dialog box, you'll see a list of SmartArt categories.
- Click on 'Hierarchy' to view the different types of hierarchy graphics suitable for organizational charts.
Reviewing the Layout Options
- The center pane will display a variety of layouts that fall under the 'Hierarchy' category.
- Hover over each layout to see a preview and a brief description of the layout on the right pane.
- The layouts include options such as 'Organization Chart,' 'Picture Organization Chart' (if you want to include images), 'Name and Title Organization Chart,' and more specialized layouts like 'Half Circle Organization Chart' or 'Horizontal Hierarchy.'
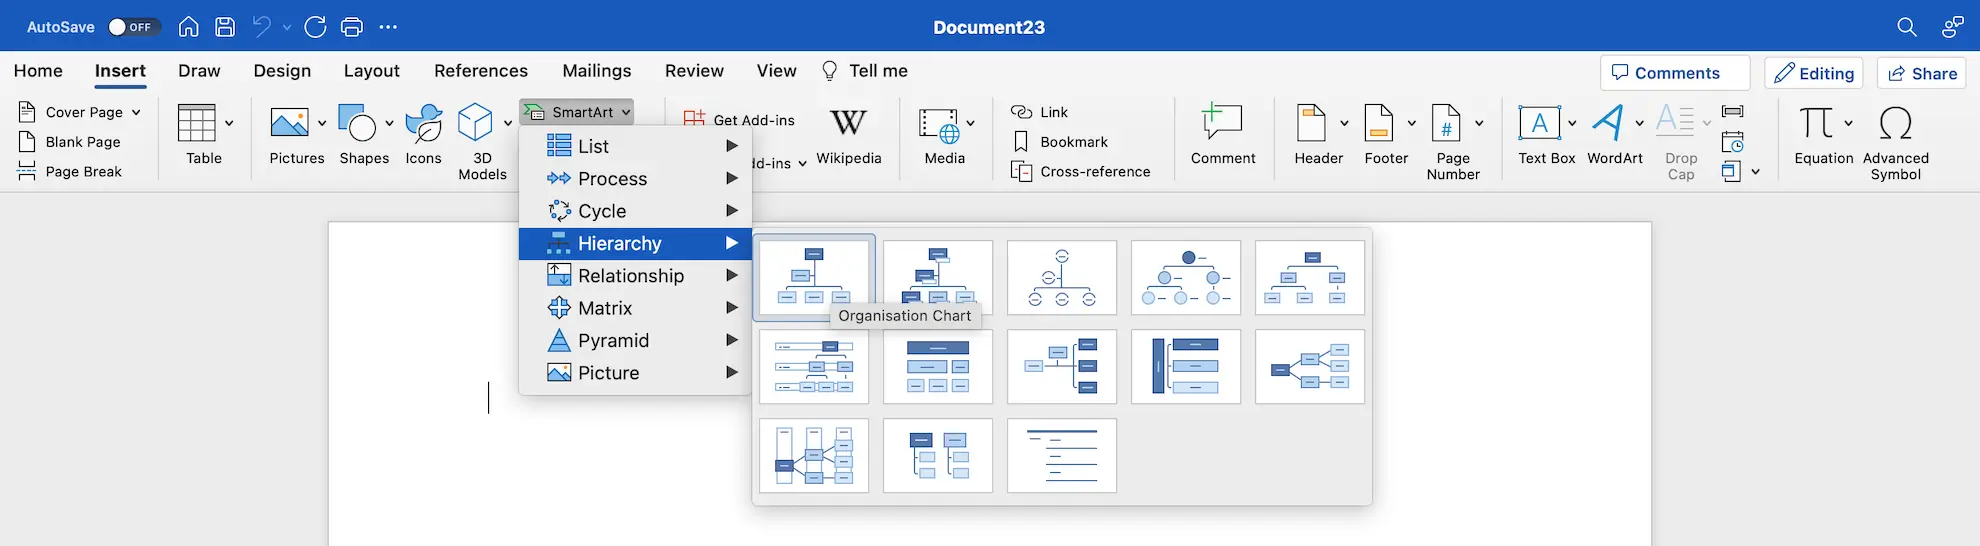
Selecting the Best Chart Layout for Your Needs
- Consider the size and complexity of your organization when choosing a layout. For smaller organizations, a simple 'Organization Chart' might suffice.
- For larger organizations, you might need a layout that allows for more levels and positions, such as the 'Name and Title Organization Chart.'
- If you want to include pictures of team members, the 'Picture Organization Chart' can make your chart more personal and visually engaging.
Crafting Your Organizational Chart in Word
Step 4: Adding Your Employee Details
Once you've selected the appropriate layout for your organizational chart in Microsoft Word, it's time to populate it with the details of your employees. Here's how to add the names, titles, and other relevant information to your chart:
Starting with the Top Position
- After inserting the SmartArt graphic, the top box will automatically be selected. This box is typically reserved for the highest-ranking position within the organization, such as the CEO or President.
- If the top box is not selected, click on it to make it active.
Entering the Employee's Name and Title
- With the top box selected, you will see a blinking cursor inside it, indicating that you can start typing.
- Enter the name of the individual followed by their title. For example, "Jane Doe, CEO" or "John Smith, President."
- If you prefer to separate the name and title on different lines, press 'Enter' after typing the name to move the title to the next line.
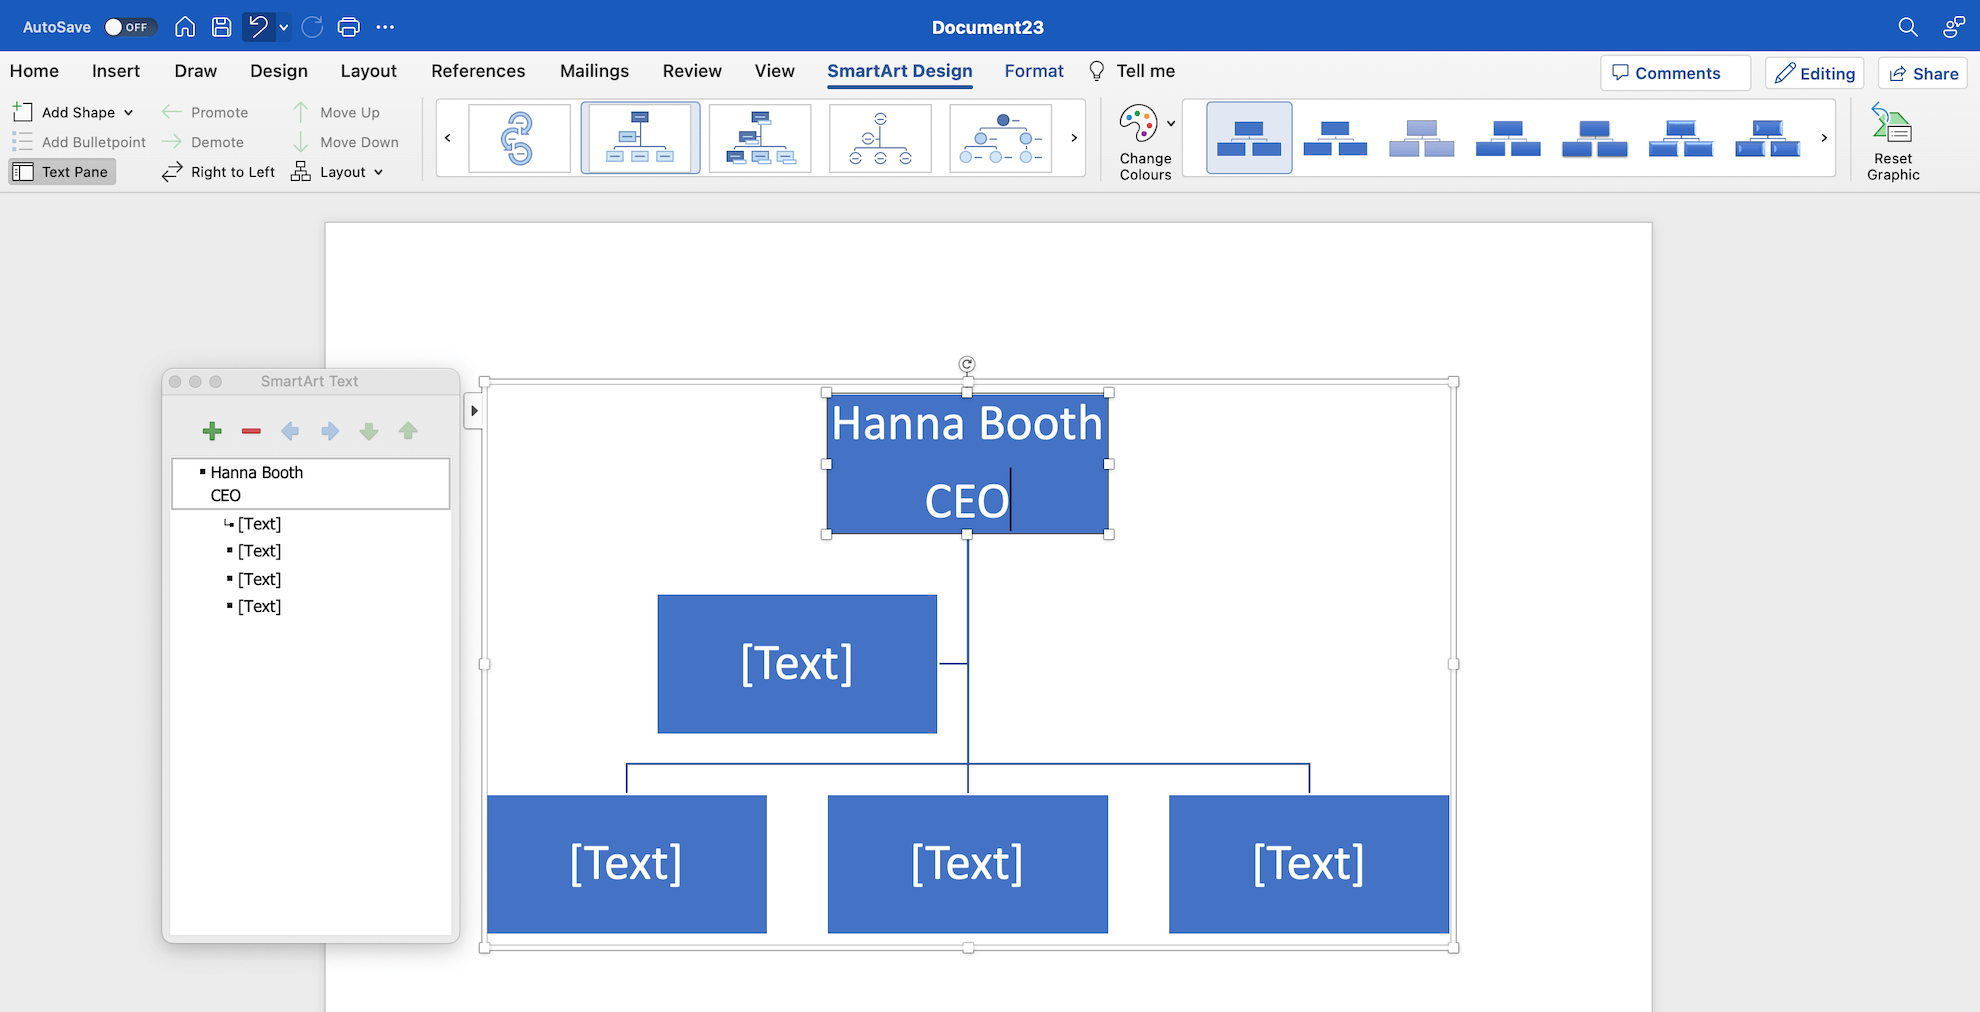
Adding Additional Details
- If you need to include further details such as department names or contact information, you can either:
- Add a text box outside of the SmartArt graphic by selecting 'Insert' > 'Text Box' and placing it near the relevant position.
- Use the 'Text Pane' associated with the SmartArt graphic. You can toggle the 'Text Pane' by clicking on the small arrow on the left side of the SmartArt graphic. Here, you can add additional lines of text that will appear within each SmartArt shape.
Step 5: Inserting Subordinate Positions
Adding subordinates to your organizational chart in Microsoft Word is a straightforward process thanks to SmartArt. Here's how to insert subordinate positions and let SmartArt do the aligning for you:
Using the Add Shape Feature
- Click on the box that represents the superior position to which you want to add subordinates. This box will be highlighted to indicate it's selected.
- With the superior box selected, go to the 'SmartArt Tools Design' tab on the ribbon. If you don't see this tab, make sure you've selected the SmartArt graphic.
- In the 'Create Graphic' group, you'll find the 'Add Shape' button. Click on this to see the different options for adding new shapes.
- From the 'Add Shape' dropdown, select 'Add Shape Below.' A new box will appear directly below the selected superior box, linked to it by a line indicating the hierarchical relationship.
- SmartArt will automatically align this new subordinate box with any existing subordinates, maintaining a clean and organized layout.
Entering Information in the New Box
- Click on the new subordinate box and type in the position title, name, or any other relevant information.
- If you need to add additional subordinates, repeat the steps above for each new position.
Adjusting the Layout if Necessary
- If the automatic alignment isn't quite right or if you want to change the layout style, you can do so by selecting the new subordinate box and using the 'Layout' or 'Promote/Demote' buttons in the 'Create Graphic' group.
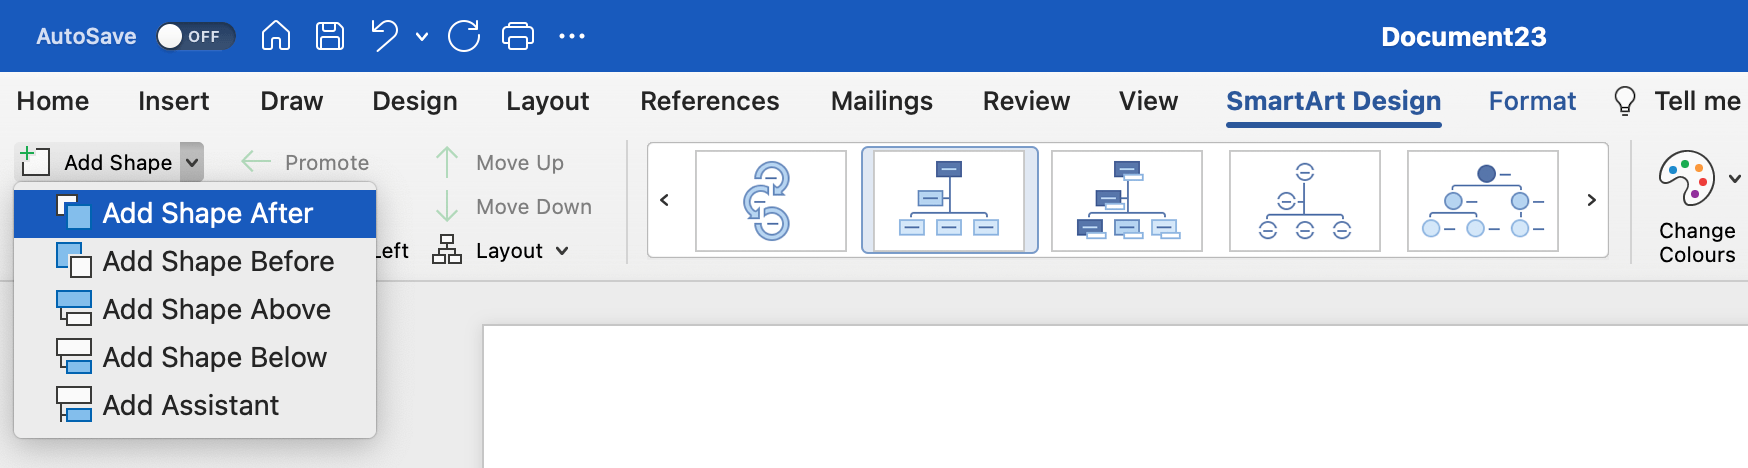
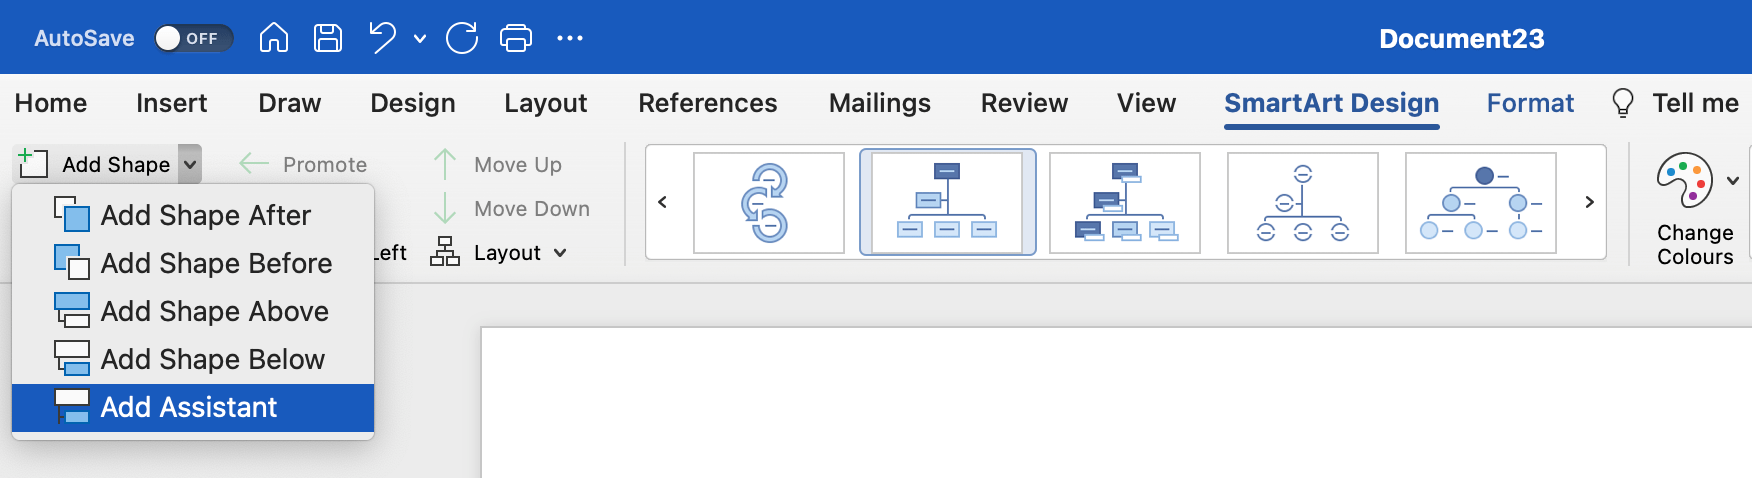
Step 6: Creating Assistant Positions
Sometimes, a role isn't directly below another but rather an assistant to it.
- To add an assistant position, select the superior's box and again go to 'Add Shape.'
- This time, select 'Add Assistant.' Word will place and align the assistant box accordingly.
Refining Your Organizational Chart in Word
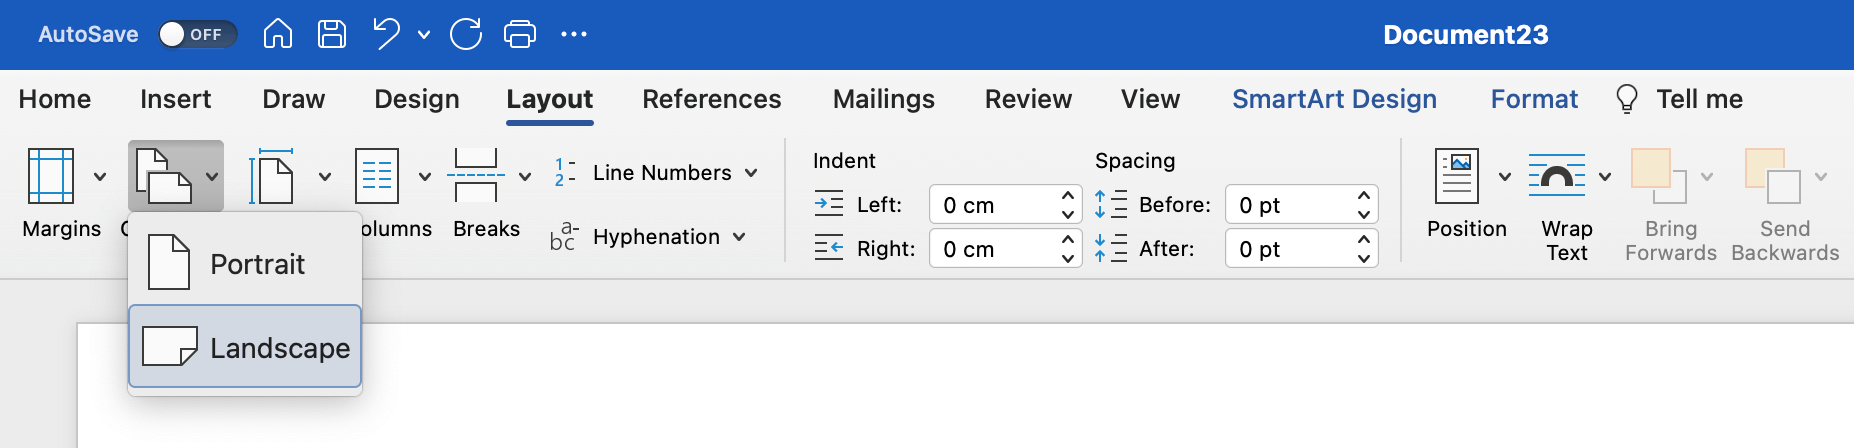
Step 7: Changing your Org Chart Page Layout
- Go to the 'Layout' tab (or 'Page Layout' in some versions of Word) in the ribbon at the top of Word.
- In the 'Page Setup' group, you'll find the 'Orientation' option.
- Click on 'Orientation,' and you'll see two options: 'Portrait' and 'Landscape.'
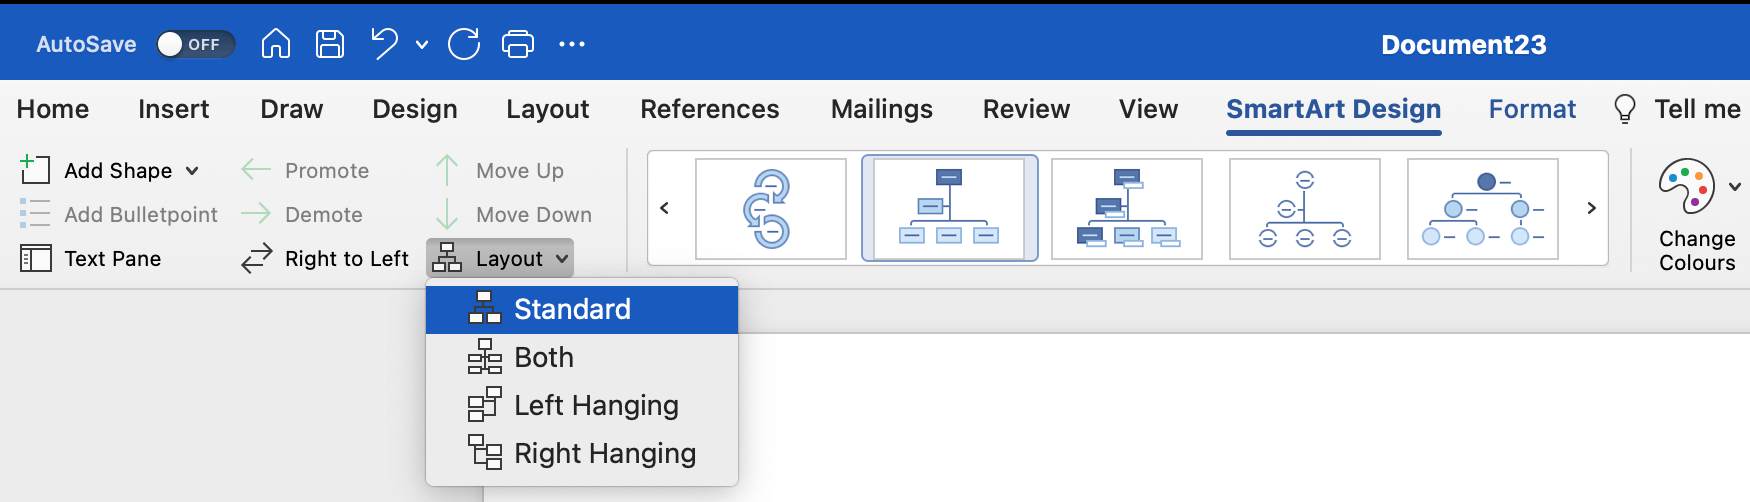
Step 8: Choosing your Org Chart Hanging Layout
As your chart grows, you may need to adjust the layout to keep it readable and visually appealing. Use the 'Layout' options in the SmartArt Tools Design tab to rearrange the positions.
- Ensure that the 'SmartArt Tools' tab is activated. If it's not, simply click on the SmartArt graphic, and you should see the 'Design' and 'Format' tabs appear on the ribbon.
- Under the 'SmartArt Tools Design' tab, look for the 'Create Graphic' group.
- Within this group, you'll find the 'Layout' button. Click on it to reveal a dropdown menu with different layout options.
- The dropdown menu will show several hanging layout options, such as 'Standard,' 'Both,' 'Left Hanging,' and 'Right Hanging.'
Styling Your Org Chart in Word
After you've structured your organizational chart in Microsoft Word, styling it is the next critical step. A well-styled chart is not only visually appealing but also enhances readability. Here's how to give your org chart a professional and polished look:
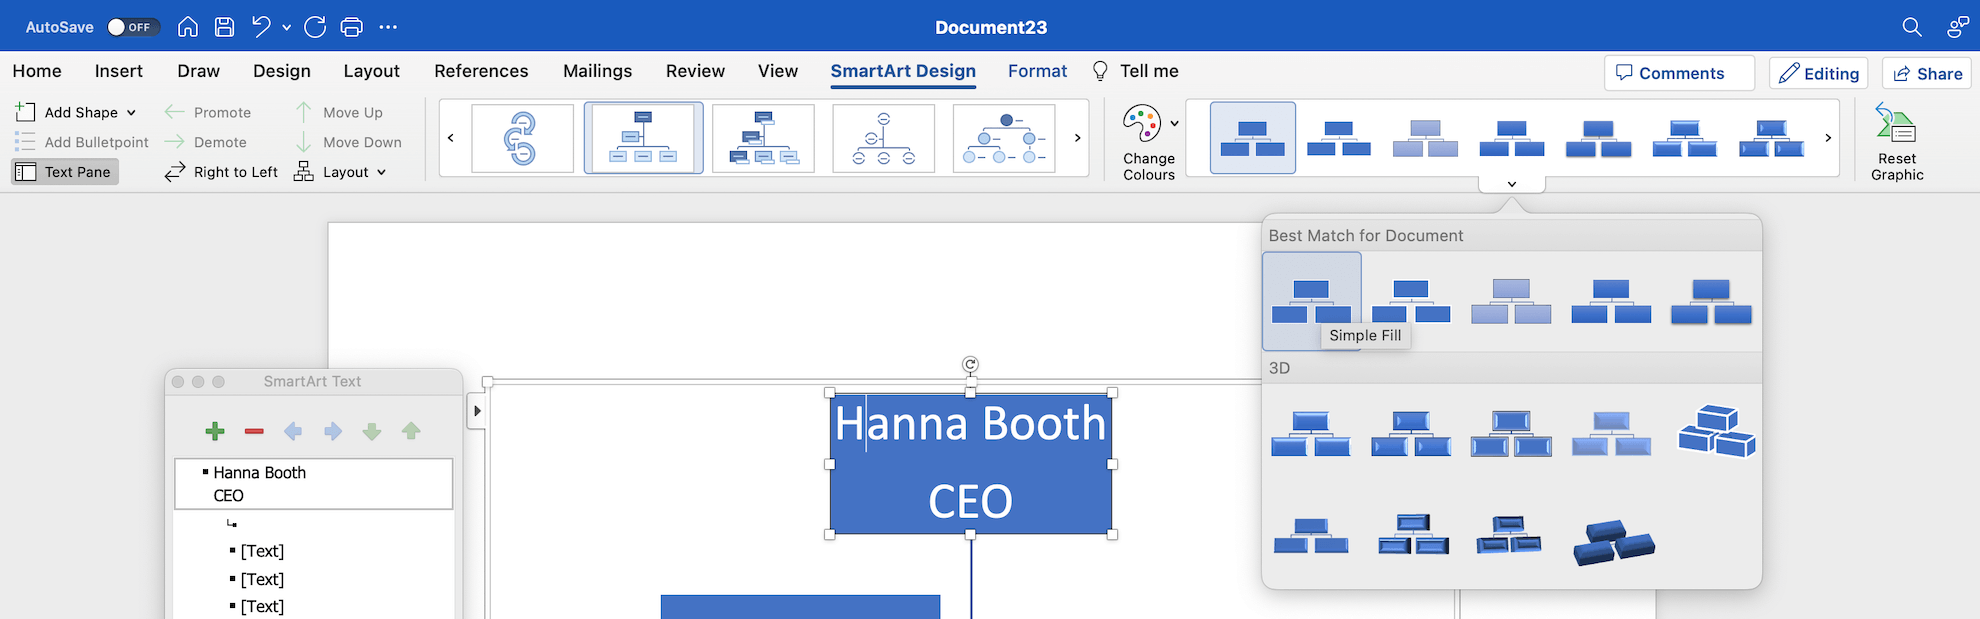
Step 9: Choosing a SmartArt Style
- Click on any shape within your SmartArt graphic to activate the 'SmartArt Tools' tabs.
- Navigate to the 'SmartArt Tools Design' tab to access the styling options.
- In the 'SmartArt Styles' group, you'll find a gallery of styles that you can apply to your chart.
- Hover over the different styles to preview how they will look on your chart.
- Click on the style you prefer to apply to your entire organizational chart.
- For additional flair, you can add effects such as shadows, reflections, glow, soft edges, bevels, and 3D rotation.
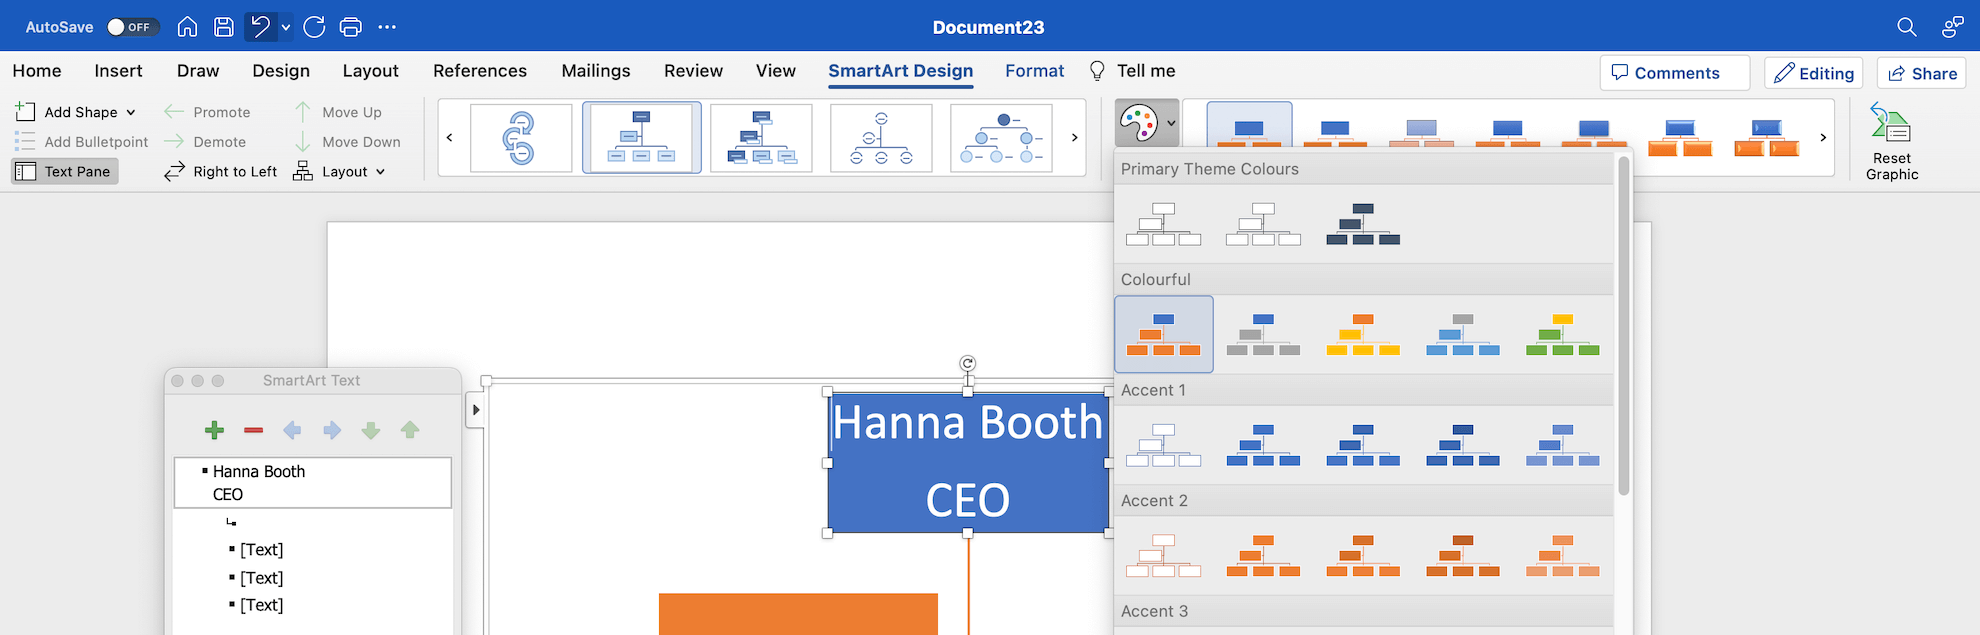
Step 10: Customizing Colors
- To further customize the look of your chart, click on the 'Change Colors' button in the 'SmartArt Styles' group.
- A drop down menu will appear with color schemes that coordinate with the current theme of your Word document.
- Select a color scheme that matches your company's branding or the tone of your document.
Step 11: Formatting Individual Shapes
- If you want to style individual shapes within your chart, click on the shape you want to customize.
- Under the 'SmartArt Tools Format' tab, you can adjust the shape fill, outline, and add effects to that specific shape.
- Use these options to highlight key positions or to denote different departments or groups within your organization.
Step 12: Adjusting Text Style
- Click on any text within your chart to bring up the text formatting options.
- Use the 'Home' tab to change the font, size, color, and style of the text to improve clarity and visual appeal.
- Consistency is crucial, so ensure that the text formatting is uniform across the chart unless you're highlighting specific elements.
Step 13: Aligning and Spacing
- Proper alignment and spacing can greatly impact the readability of your chart.
- Use the 'Align' and 'Distribute' options under the 'SmartArt Tools Format' tab to ensure that shapes are evenly spaced and aligned.
- These tools are particularly useful when you've manually adjusted the position of shapes and want to tidy up the overall look.
Finalizing Your Organizational Chart in Word
Step 14: Reviewing and Editing
Take a step back and review your chart. Look for any inaccuracies or areas where the hierarchy isn't clear. Edit as necessary by adding, removing, or rearranging boxes.
Step 15: Saving and Sharing Your Organizational Chart
Once you're satisfied with your chart, save your document. It's a good practice to save periodically as you work, but make sure you have a final saved version. Now that your chart is complete, it's time to share it with your team. You can print it, email it, or include it in company documentation. Ensure it's accessible to those who need it.
Creating Your Org Chart as a Word Template
Once you've perfected your organizational chart in Microsoft Word, you might want to save it as a template. This allows you to reuse the structure and design for future charts without starting from scratch. Here's how to save your organizational chart as a Word template:
Preparing Your Document
- Before saving your document as a template, remove any specific information that won't be part of the template (e.g., names and titles that are likely to change).
- Leave placeholders or generic text to guide users on where to input data.
Accessing the Save As Feature
- Click on the 'File' tab in the ribbon to open the backstage view. Then select 'Save As' from the menu on the left-hand side.
- In the 'Save As' dialog box, click on the 'Save as type' dropdown menu.
- Scroll down and select 'Word Template (*.dotx)' from the list of file types. This will change your document to a template format.
- In the 'File name' field, give your template a descriptive name that you'll easily recognize later. It's a good practice to include 'template' in the file name (e.g., 'OrgChartTemplate.dotx').
- Once you've selected the template file type and named your file, click the 'Save' button.
- Your organizational chart is now saved as a Word template.

Using Your Org Chart Word Template
- To use your template in the future, go to 'File' > 'New' in Word.
- Click on 'Personal' to view your custom templates.
- Select your organizational chart template to create a new document with your pre-styled chart.
Updating Org Chart Word Template
- If you need to make changes to your template later, open the template file, make your changes, and save the template again.
- Remember to save it as a Word Template (*.dotx) again, not as a regular document.
Considering Alternatives to Word
Given these limitations, it may be worth considering alternative solutions for creating and maintaining organizational charts, especially for larger or more dynamic organizations.
Here's a list of some popular organizational chart tools that you might consider:
1. OneDirectory
OneDirectory is a visual employee directory and org chart tool that's built for Microsoft Office 365. It automatically generates organizational charts from your Office 365 user profiles, keeping the charts up-to-date with your company's active directory.
2. Microsoft Visio
Visio is a diagramming tool that offers advanced charting options, integration capabilities, and detailed customization.
 Greg Bennett
3. Microsoft Excel
For those comfortable with spreadsheets, Microsoft Excel offers the ability to create organizational charts through built-in templates or add-ons.
4. Microsoft PowerPoint
PowerPoint, often used for presentations, also can create organizational charts. It offers similar SmartArt graphics as Word but with the added benefit of being part of a slide deck, which can be useful for presentations or reports.
Greg Bennett
Conclusion
And there you have it: a step-by-step guide to creating an organizational chart in Word. With SmartArt, the process is intuitive, and the results are polished.
Whether you're a small startup or a large corporation, your organizational chart is a vital tool in your business arsenal. Use it wisely, and watch your company's communication and efficiency soar.